OS X Mavericks (10.9) introduced Finder tags, which are like colored file labels on steroids. When importing files into Final Cut Pro X you can create a keyword for each Finder tag on the files you are importing.
Wouldn’t it be great to go the other way, and turn your organized keywords in Final Cut Pro X into a catalog of tags? That’s what FindrCat does!
Three easy steps
1. Run FindrCat.
2. Select an Event of clips (with no “files missing” warnings), then drag to the dock and drop onto the FinderCat icon.
(For Final Cut Pro X versions 10.1 and 10.2, choose File > Export XML…, save the .fcpxml file, then drag-and-drop that onto the FindrCat dock icon or choose File > Open… and navigate to the .fcpxml file.)
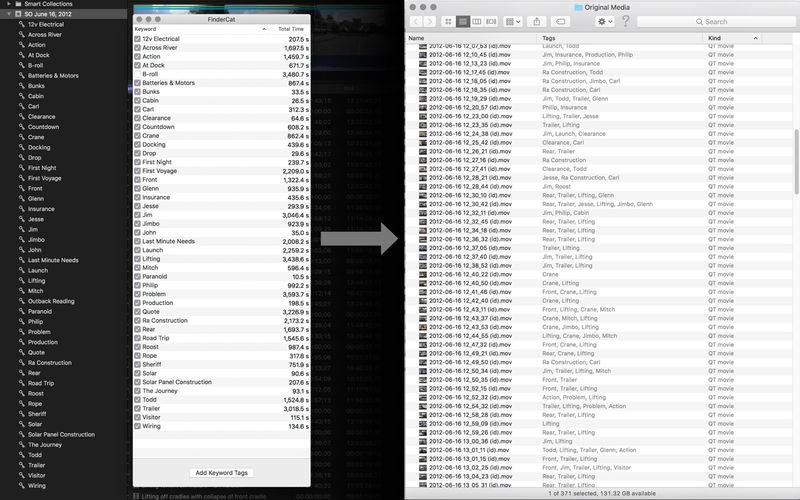
3. Use the checkboxes to choose the keywords you want to become Finder tags and click Add Keyword Tags. You’ll get an alert from FindrCat telling you how many keyword tags were added.
And now you have keyword tags on your media files with almost no effort. This also embeds metadata into the files that can be restored later by FindrCat (Pro).
Tip: Tags travel with their file when they are copied from one Mac to another
Tagged files are easier to find, turning Finder into a user-friendly media asset manager:
• Open a Finder window and show the Tags area in the sidebar. Click the All Tags… at the bottom and a column shows you all your tags. Select a tag to see every media file tagged with this keyword.
• In Finder choose File > Find (Command-F) and start typing a keyword name into the search box and you’ll be given the option to see all files with that tag.
• To see which tags are on your media files, open a Finder window and choose View > as List (Command-2). Control-click on a list header and choose Tags from the contextual menu to add a column showing the tags on your files.
Important: Spotlight does not index files stored inside a Library bundle, so searching for tags will only work with external media. Spotlight will not index folders or volumes that have been excluded in Spotlight’s Privacy pane.
To import your files back to Final Cut Pro X, select the media files resulting from your search or filtering in Finder and drag them to the Final Cut Pro X icon. The files will be imported to the currently selected Event. To import the Finder Tags as Keywords, be sure to turn on the checkbox to make keywords From Finder tags. Instant keyword organization in Final Cut Pro X!
———————————————————————
Turning Finder Tags into Keywords during import into Final Cut Pro X is unfortunately limited to applying keywords to the entire clip. For more control, you can upgrade via in-app purchase to FindrCat (Pro) which restores clips with their:
• Video and Audio Roles;
• Notes;
• Markers and Chapter Markers;
• Keyword ranges and Favorite/Reject ranges;
• “Excessive Shake” and “find people” analysis keywords;
• Video Inspector adjustments: Compositing, Transform, Crop, Distort, Stabilization, Rolling Shutter, Spatial Conform;
• Audio Inspector adjustments: Volume, Equalization, Loudness, Noise Removal, Hum Removal, Pan; and
• Metadata exported in the chosen Metadata View.
Restoring clips into Final Cut Pro X
1. In FindrCat or FindrCat (Pro) version 1.1 or later, follow the instructions above. This embeds metadata into the files that can be restored later by FindrCat (Pro).
Tip: Choose a metadata view from the pop-up menu in the Inspector. Unless you have a specific set of metadata you want to use, we recommend Extended.
2. In Finder, search for or filter your tagged clips using the instructions above.
3. Drag the clips you want to import to the dock and drop onto the FindrCat icon. FindrCat (Pro) will import the clips into the Final Cut Pro X Library you choose, and will restore your clips with Roles, Notes, Markers, Keywords, ratings, video adjustments, audio adjustments and metadata that were previously added to the clips using either FindrCat or FindrCat (Pro).
Requirements: Final Cut Pro X version 10.1.2 or later