* Find the best among hundreds of fonts for some text *
FontsView 3 is the 2nd major software upgrade for a desktop application. Its ultimate goal is to help the user pick the best font among hundreds for a particular string. This software upgrade comes with several new features. What was missing in FontsView 2 is access to all typefaces. The user could use only bold and italic typefaces in the last version. The user now has access to all available typefaces.
– What’s new? –
1. The font list is detached from the main application window. Under a separate window called Fonts, the user can now have access to all available typefaces like bold, italic, light, oblique.
2. Choose Save As Rich Text For All Fonts under File to save to your disk a tab-separated rich text format (RTF) file that contains numbers, font names, styled text strings for all available fonts.
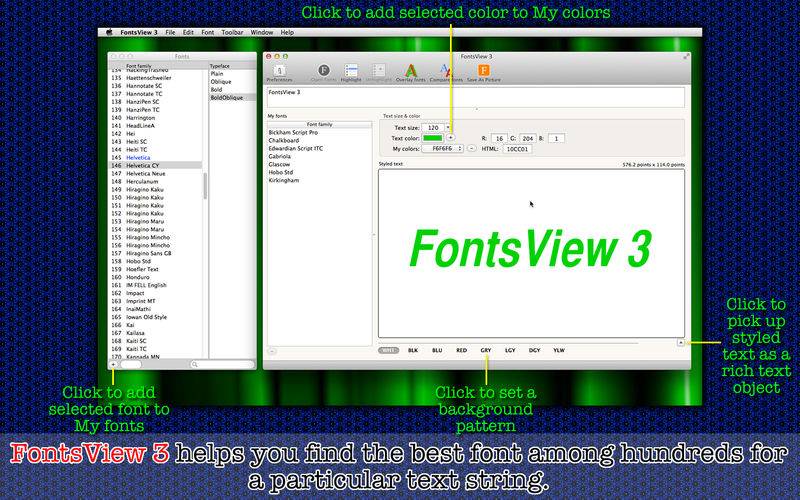
3. Use Overlay fonts to overlay colored, translucent layers of styled text for selected fonts.
4. My colors lets you store colors that you frequently use. Just explore a drop-down menu to select one.
5. The application comes with a complete Japanese localization.
6. Quick Tour, which will automatically open when you first launch the application, will guide you through it and help you learn how to use FontsView 3 quickly.
– Features –
1. Click on the add (+) button at the bottom of the font panel to add the selected font to My fonts, a list of fonts that you want to have quick access to.
2. Click on the add (+) button next to the text color button to add the selected text color to My colors, a list of text colors that you want to have quick access to. Explore the drop-down menu right below the text color button to select a my color.
3. Select a font name under the font panel and click on the Highlight toolbar button to highlight the selected font name. Choose Set Highlight Color under Font to change highlight colors.
4. Enter an input text string and then click on the Overlay font toolbar button to compare fonts by seeing colored, translucent layers of styled text in different fonts.
5. Enter an input text string with an appropriate text size and then click on the Compare fonts toolbar button to see a list of styled text strings by all available fonts.
6. Click on the Save As Picture toolbar button to save to your disk the styled text string shown over the display canvas as a picture (BMP, GIF, JPEG, JPEG 2000, PNG, TIFF).
7. Open the disclosure button at the bottom-right corner to get a styled text string that can be used with other RTF document editors including TextEdit.
8. Save a list of all available fonts as a text file or an XML file.
9. Save to your disk a tab-separated rich text format (RTF) file that contains numbers, font names, styled text strings for all available fonts.
10.Choose Save Settings under FontsView 3 to save internally current settings including an input text string, text size, text color, background pattern selection. Choose Load Settings to load your saved settings at any time.
11.The application remembers the positions and the dimensions of the main window, the Fonts window, the Overlay fonts window, the Compare fonts window.
12.The main application window and others support the fullScreen mode.
13.The application supports the retina screen. (tested with 2014 2.6 GHz 13″ MacBook Pro)
14.Languages: English and Japanese only.
15.Application file size: 17.4 MB.
16.The application comes with a built-in 19-page user guide. Choose Show Quick Tour under FontsView 3 whenever you need to see it.
– System requirements –
1. 10.8 (tested with 10.8.5), 10.9 (tested with 10.9.5), 10.10 (tested with 10.10.2)
2. 64-bit system
– Limitations –
1. A final picture that you export out of the styled text canvas will be saved to a disk with resolutions of 72 dpi x 72 dpi for non-retina screen models (144 dpi x 144 dpi for retina screen models with JPEG, PNG, TIFF).