CREATE STUNNING COMPOSITING USING PHOTOSHOP CS 6
Learn how to use the power of Photoshop CS 6 to create great composite. You will learn how to extract your subject, create an amazing background and blend both images together. With the power of Photoshop this style is more popular then ever.
It is like doing a great landscape and portrait at the same time !
– Are you tired of all the theory and technical jargon you have to wade through before getting to the point?
– Do you want to master the industry-leading retouch program in no time ?
– Do you want to see the full workflow of a pro photographer who is specialized in landscapes ?
– Do you want tutorials that are easy to understand and fun ?
This tutorial is probably what you are looking for.
Serge Ramelli a french photographer who specialized in urban/landscapes photography over the last 6 years and is known for his very simple way of teaching. He will train you on his complete composite workflow.
Serge is a known for his very unique way of teaching, with 2 main rules :
1. No technical terms explained with technical words, but with simple english.
2. No theory, practical and visual examples only.
The app provided 6 chapters, each chapters is a different step to create 2 main composites projects. See the final result on the previews below.
Some reviews of Serge’s photoshop’s tutorials:
“I’m a fan” *****
“Your training is fantastic, I want to thank you for the happiness your brought me with these training. I bought all of your training and used it with great success”
“Great”*****
“Great and simple training straight to the point”
«Incredible !» *****
«Very good training. This is not the first or the last training I will take from Serge.»
«Thanks so much» *****
«Very good training, thank you very much. I have been able to learn basics of camera raw and photoshop, it is so well explained !»
Chapters summary :
Chapter one :
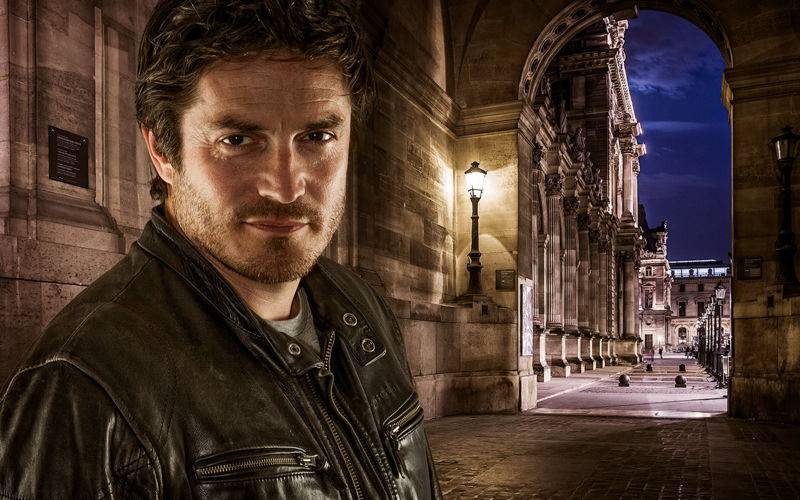
First we will retouch the background using the new amazing features in camera raw 7. A photo of the Louvre in Paris.
Chapter two :
We will then retouch our subject and extract him from his original background. This has become so easy since Photoshop CS 4 and the new quick selection tool and the refine edge option. You will learn an easy way to use this tools.
Chapter three :
Then we blend both images together, dealing with all the colors, luminosity and composition issues. To finish off we will stylize the final result.
Chapter four :
This is where we start our second project, a background of a sunset in Florida that we will first develop with Camera Raw to give it a very edgy, HDR look.
Chapter five :
We then extract our subject, a simple snapshot taken in my garden with no flashs.
Chapter Six :
We blend both images and we go there for an even more stylize feeling with a sepia look to the overall image.