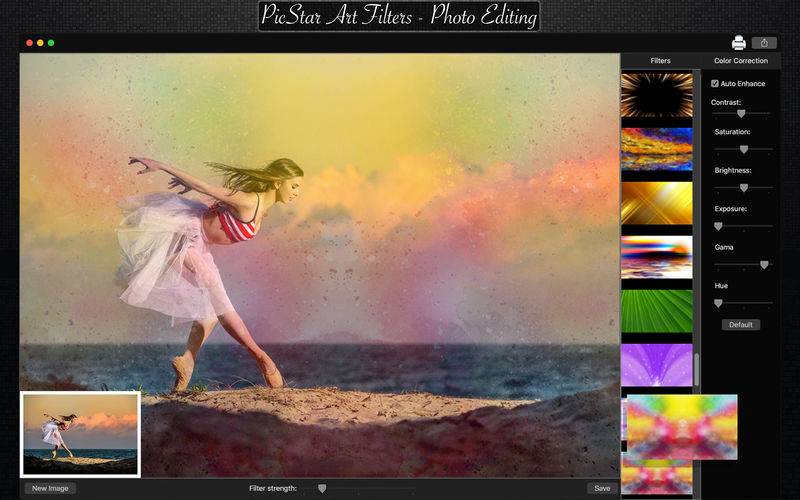
Are you looking for an app with beautiful filters and capable to apply effects on your photos? With PicStar Art Filters – Photo Editing you can apply the effects, using enhance and choose between 100 different filters.
With an easy to use interface, PicStar Art Filters – Photo Editing improves your pictures to the best result and provides you the best features that you need.
• Adding Images: You can add one image to adjust the perspective.
• Color Correction: Enhance the quality of your pictures using the tools Auto-Enhance, Contrast, Saturation, Brightness, Exposure, Gama and Hue.
• Light Adjustment: Using the exposure tool, it’s possible to increase or decrease the light effects of the picture.
• Using filters: You can choose between 100 beautiful filters to use on your image.
• Filter Strength: Choose the intensity of your filter, from minimum to maximum.
• Share on social media: With just a simple click, you can share your photo directly in social network.
• Print images: You can print your new image with just one click.
• Export Images: You can save your image with the formats PNG, JPEG, JPEG2000, TIFF and BMP.
••••••••••••••••••••••••••••••••••••••••••••••••••••••••••••
Enjoy our amazing features:
••••••••••••••••••••••••••••••••••••••••••••••••••••••••••••
• 100 different filters.
• Auto-Enhance.
• Contrast.
• Saturation.
• Brightness.
• Exposure.
• Gama.
• Hue.
• Easy to use interface.
• Export the pictures to anywhere you want.
• Share on social media.
• Easily print your photo.
• Save images with PNG, JPEG, JPEG2000, TIFF or BMP formats.
••••••••••••••••••••••••••••••••••••••••••••••••••••••••••••
How to use:
••••••••••••••••••••••••••••••••••••••••••••••••••••••••••••
1. After you run the app, select the image you wanna use or click the [ New Image ] button.
2. In Filters area, you can choose the filter you want to use.
3. To adjust the intensity of the filter, slide the Filter Strength bar.
4. Adjust the settings like you want (Auto-Enhance, Contrast, Brightness, and more).
5. For Color Change, move the Hue bar.
6. For Light Adjustment, move the Exposure bar.
7. Use the [ Default ] button if you wanna use the default settings of your image.
8. Click [ Save ] button to save your image, choosing between PNG, JPEG, JPEG2000, TIFF and BMP formats.
9. To print your image, you can click on the Printer button.
10. To post your photo on social media, you can click on the share button and choose the social network you wanna post.
••••••••••••••••••••••••••••••••••••••••••••••••••••••••••••
If you need help?
••••••••••••••••••••••••••••••••••••••••••••••••••••••••••••
Do you need any help? If you have any doubt or trouble with our products and company, like to make a suggestion or submit a request for a new feature, you can use the following tools:
Go to our website: ••• bravecloud.org
There you can find:
• Frequently Asked Questions
• List of applications
• Tutorials
and more…
You can also send an email to: ••• support@bravecloud.org
We’ll respond as soon as we can. Your contact is very important and with it we can constantly improve our apps.