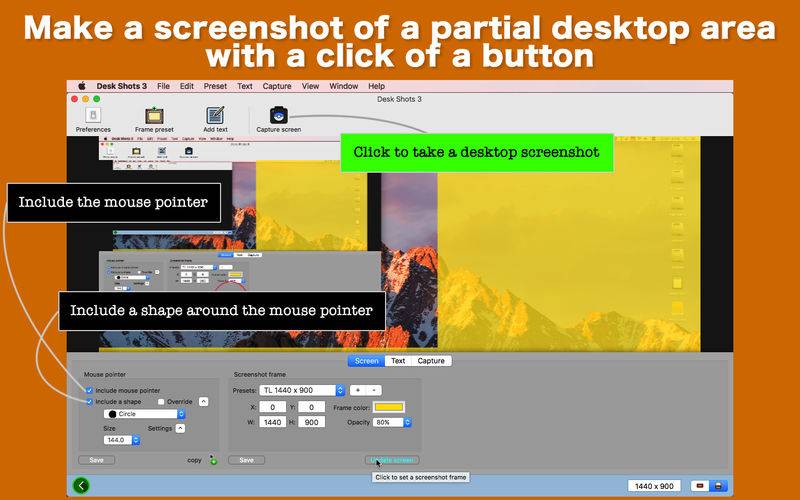
– Take a desktop screenshot with a click of a button –
Wouldn’t it be nice if you could take a desktop screenshot with just a click of a button? Don’t you hate it when an application asks you to name each file when you are in the middle of desperation and just want a few desktop screenshots? It’s true that we can take a screenshot by pressing Command + Shift + #3 (or #4), which won’t include the mouse pointer in your screenshots, by the way. What if you want to take a screenshot 10 seconds from now when you need to make some preparation before taking one?
So the initial idea behind this Desk Shots series is simple. I don’t want to name a file every time I take a desktop screenshot. I’ll name them later collectively. And I want the mouse pointer in each screenshot. Maybe, circle the mouse pointer in red so that one can tell where I’m at? Besides, I need to have several seconds of delay before taking a screenshot so that I can make some preparation like switching to a different application. Of course, there is nothing more important than to take a quick screenshot WITH JUST A CLICK OF A BUTTON. That’s what the Desk Shots series is all about.
Desk Shots 3 gives you a lot of options when it comes to making a partial screenshot over the entire desktop area. You can choose to include or not include the mouse pointer. You can override the system cursor and replace it with a cursor type of your selection. How about circling the mouse pointer? Or write up a quick note and include it in your screenshots?
– What’s new? –
1. The user can insert one or more rectangular comment boxes to a screenshot.
2. The user can consecutively take multiple screenshots at a time, each one taken every second.
3. The user can select a position where the countdown timer appears.
4. There are 18 shapes (circle, square, diamond, star, heart…) to choose from. The user can choose to include a shape around the mouse pointer.
– Features –
1. Set up a folder once so that the application knows where to save your desktop screenshots. No, Desk Shots 3 won’t prompt you to name a file every time you click on the capture button. Right, all you have to do is click on ‘Capture Screen’ at the top.
2. Let the application automatically name each screenshot with a base name you set + an underscore + a number so that it will never overwrite your existing files.
3. Define a partial area of your desktop (like 1,440 pts x 900 pts over 2,560 pts x 1,440 pts) so that the application will make a cutout. Create presets.
4. Add one or more rectangular comment boxes to your screenshots.
5. Resize a comment box with your mouse pointer.
6.Make selected comment box visible or invisible.
7.Select a typeface (regular, bold, italic, condensed…) over a font family you select in order to write a text comment.
8.Include or not include the mouse pointer in your screenshots.
9.Include or not include a shape (circle, square, octagon, diamond, heart, start…) of your selection around the mouse pointer.
10.Fill a shape of your selection with a color. Apply a stroke to it.
11.Override the current system cursor and replace it with a cursor type of your selection.
12.Delay in taking a desktop screenshot with a circular countdown timer appearing on your desktop.
13.Select a position where to display a countdown timer.
14.Consecutively take multiple desktop screenshots. Pick a number (x), and the application will make a screenshot every second x times.
15.Rescale screenshots.
16.The fullScreen mode is supported.
17.The application supports the retina screen. (tested with 2014 2.6 GHz 13″ MacBook Pro)
18.Languages: English only.
19.Application file size: 30.0 MB.
20.The application comes with a built-in 16-page user guide. Click on the button that says ‘Learn how to use Desk Shots 3’ in the Home screen.
– System requirements –
1. 10.12 (tested with 10.12.1 and 10.12.6), 10.13 (tested with 10.13.4)
2. 64-bit system
3. A display capable of showing at least 660 pts x 558 pts